Wednesday, December 24, 2008

How To: Manage binder sizes on the Pfx Engagement Server(s)

Issue: How do I pull a meaningful list of binders from our Central File Room(s) along with their file sizes?

Background: In a Windows environment, a "binder" is represented by a single directory (or folder) on an employee's workstation and on the server. The directory has a unique ID called a GUID. That directory houses all the workpaper files shown to the user through the Binder View within Pfx Engagement. This setup poses stumbling blocks for system (those maintaining the hardward) and application (those administrating the Pfx Engagement) administrators when trying to manage the binders' size on the server hard disk.
  1. 1. GUID: This is an unique identifier used to keep track of the binders in an efficient and effective way which is standard industry practice. While this is great for computers, humans can't easily make heads or tails of it. It will have to translated into something recognizable to humans so that it can be associated with a specific binder in the views within Pfx Engagement.

  2. 2. File Size: This is not as easy as saying, "How big is my Word document?" Since a binder is actually a directory on the hard disk, what is actually being asked is "How much space is being used by this directory?" or "How big is this collection of documents?". Directory size is not displayed by default in Windows Explorer making it difficult to view manually (third party applications are available to add this to Windows Explorer).

  3. 3. Information Accessibility: This is something that may need to be monitored more frequently than annually. As such, creating a list of binders over a certain size should be easier than manually typing the list (basically, running a report).
Resolution: There are two applications that help address these stumbling blocks: ReportBuilder by CCH (go here and login) and Windows XP SP2 Support Tools by Microsoft. Both applications can be installed on the Pfx Engagement administrator(s) computer; there is no need to install them on the server.

Once both applications are installed, peform the following steps to identify binder sizes:
  1. 1. Open a Command Prompt (Start Run Type "command" or "cmd")

  2. 2. Type the following:

    diruse /* /m /, "\\[Pfx engagement server name]\Admin\workpapers\[Central File Room name]" > "[path]\[desired file name].txt"

    For example:

    diruse /* /m /, "\\engagement\Admin\workpapers\Main Office" > "C:\Engagement Reports\BinderSizes-20081227.txt"

  3. 3. Start ReportBuilder (found in C:\Pfx Engagement\WM\Utilities\Report Builder)

  4. 4. Enter the name of the server and press OK

  5. 5. Select "Client/Binders List" from Report on the menu bar

  6. 6. Press "Export to Excel"

  7. 7. Move (cut / insert) the "bid" column to Column A and sort in ascending order

  8. 8. Save the Excel file in the appropriate location

  9. 9. Go to the tab named "Sheet 1"

  10. 10. Import the data in the .txt file created in step 2

  11. 11. Add the column headings ClientID, Client Name, and Binder Name

  12. 12. Add a VLOOKUP for each of the added columns, pulling the date from the "Client Binder List" tab (you may want to remove the VLOOKUP formulas based on how you're going to use the data)
Now you're all set. You now have a list of all the binders on the server including all finalized and unfinalized binders and their respective size on the server. This can help the system and application administrators manage the binder sizes to give the most functionality to the users and not overload the network or server.

Wednesday, October 22, 2008

Error: The finalization process for one or more of the selected binders did not complete successfully.

Issue: While trying to finalize a binder, Pfx Engagement hangs or freezes and has to forced to end. After Pfx Engagement is restarted, the binder in the local file room indicates the binder is finalized but the server shows it in process. The user receives an error stating the following when trying to delete the binder.
CRITICAL ERROR: The finalization process for one or more of the selected binders did not complete successfully. The binder(s) cannot be deleted until this problem is corrected.

Please contact Technical Support for assistance before continuing work on the affected binder(s).
Resolution: Perform a full synchronization by right-clicking on the binder in the local file room and selecting "Synchronize."

Wednesday, August 27, 2008

How To: Convert workpaper files on the server to their native format

Issue: Workpaper files, not an entire binder, was restored from backup. The contents of the workpapers need to be verified before the restore can continue. The server side workpaper files have the extension .szp. How do I convert the .szp file back into the native document formats (e.g. .doc, .xls, .pdf)?

How To:
  1. 1. Change the file extension from .szp to .zip
  2. 2. Open the .zip using the password obtained from CCH (call the help line; for security reasons, it will not be divulged here)
  3. 3. At this point, you can open the native file or extract it to another location


NOTE: There is only one native file per zip file.

NOTE 2: If there are lots of restored .szp files, you may want to consider having the netork administrator write a command line script to convert all the .szp files and extract all the native format files to another directory or folder.

Tuesday, August 19, 2008

How To: Protect (secure) a Word document

This can be done by following the steps below.
  1. 1. Create the document
  2. 2. Go to Tools Protect Document
  3. 3. Select the appropriate type of protection
  4. 4. Enter a password and click OK
NOTE: Only "Forms" protection prevents a user from copying text and images in a Word document. Meaning, if "Forms" protection was used, a user would not be able to select any text or graphics in the document preventing the user from copying and pasting the content into another document.

How To: Save a Word document as a template

There are two ways to create document template, one from outside Engagement and the other from inside.

Outside Engagement:
  1. 1. Create the document
  2. 2. Click File Save As...
  3. 3. Change the document type to "Document Template" or ".dot"
  4. 4. Navigate to the appropriate folder
  5. 5. Change the document name if appropriate
  6. 6. Click Save
Inside Engagement:
  1. 1. Create the document as you normally would in Engagement
  2. 2. In the binder view, right-click on the document and select "Save as Template..." *
  3. 3. Navigate to the appropriate folder
  4. 4. Change the document name if appropriate
  5. 5. Click Save
* You must have specific user rights to create workpaper templates. See your ProSystem fx Engagement administrator if this option is grayed out.

NOTE: Templates should be saved to a network location that can be accessed by all the users. Each user's Engagement install will have to be pointed to this location in order to access the templates easily. Please refer to the Users Manual to change the template location within Engagement.

NOTE 2: If some or all users have laptops and frequently work in the field (not connected to the office network), the network administrator may need to setup a script to push the templates to each laptop so the templates are available to laptop users in the field.

Saturday, August 16, 2008

Issue: ProSystem fx Engagement toolbar buttons don't work with protected Word documents

Issue: Some have expressed the desire to protect work programs or checklists in Word (i.e. create a Word form). However, when a Word document is protected, the ProSystem fx Engagement toolbar buttons, such as "Insert WP Reference" doesn't work.

Cause: The toolbar is specifically programmed to check if the active Word document is protected. If it is, when a toolbar button is pressed a message is returned stating that the document is protected or the engagement links are frozen.

Resolution: CCH created a utility call the Protected Files Utility to address this issue. Once a template is created, it is run through the utility which creates a hash file to be stored on each user's computer. The password used to protect the Word document is stored securely within the hash file which is accessed by Engagement in order to updated the protected Word form. Instructions for each part of the process are below.

Engagement Administrator:
  1. 1. Create the file, including all the proper form fields.
  2. 2. Save as a Word template
  3. 3. Protect the document
  4. 4. Save a close the document
  5. 5. Start the Protected Files Utility
  6. 6. Navigate to and select the recently protected document
  7. 7. When prompted, input the same password used to protect the document
  8. 8. Make a copy of the template and hr.arf (located in "[local hard drive]\Pfx Engagement\WM") files available to the Network Administrator
Network Administrator:
  1. 1. Place the template file in a central location accessible to all users (workpaper template location)
  2. 2. Place the hr.arf file in each user's "[local hard drive]\Pfx Engagement\WM" folder
NOTE: There are alternate configurations which may work. See the complete documentation on the Engagement installation CD.

Engagement User: The Engagement user does not have to perform anything explicit. Once the hr.arf file is placed on all the users' local machines the toolbar functionality should work.

Wednesday, June 25, 2008

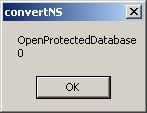
Error: User receives an OpenProtectedDatabase error when trying to open a Trial Balance or Trial Balance Report

Error: A user receives an OpenProtectedDatabase error (see picture below) when trying to open a Trial Balance or Trial Balance Report.


Cause: When Excel is forced to close (e.g. is terminated through the Windows Task Manager), the .ldb file associated with the open Trial Balance or Trial Balance Report is not deleted.


Resolution: Follow the steps below.


  1. 1. Open a Windows Search window (e.g. select Search from the Start menu)

  2. 2. Search for all files with a .ldb extention (you may also want to limit the search to C:\Pfx Engagement for faster results)

  3. 3. Right-click on the resulting file and select Open Containing Folder

  4. 4. Select the .ldb file and press delete

  5. 5. Close the containing folder and the Search window

Error: Toolbar buttons are off by one

Issue: The toolbar buttons in the File Room or Binder windows are off by one.

Cause: This is usually caused after an upgrade to Engagement.

Resolution: Follow the steps below.
  1. 1. In Engagement, navigate to Tools Customize from the toolbars
  2. 2. Press the Reset Toolbar button
  3. 3. Press Close

Monday, June 23, 2008

How To: Turn off Track Changes in Word

Issue: Some users have begun to use Word's Track Changes functionality to have an audit trail on the changes within memos and other Word documents. Not all users are familiar with Track Changes and cannot turn it off.

Resolution: Follow the steps below to turn off Track Changes.
  1. 1. While the document is open, make sure the "Reviewing" toolbar is viewable (right-click on any of the toolbars and select "Reviewing")
  2. 2. Press the button second from the far right so it is NOT highlighted yellow (this turns off Track Changes)
  3. 3. Press the dropdown arrow to the right of the button with the blue checkmark
  4. 4. Select "Accept All Changes in Document"
  5. 5. Save and close the document

Be aware that a user can go through each change individually and decide which changes should be accepted or rejected instead of accepting or rejecting all changes in the document. For a more in-depth discussion of Track Changes, please refer to this Microsoft document.

Saturday, June 21, 2008

How To: Remove all tickmarks in an Excel document at the same time

Issue: Many users have asked if there is a way to remove all the tickmarks from an Excel document at the same time. This especially applies when a binder is rolled forward and the workpaper is marked as "Rollforward." When a workpaper is rolled forward, all the tickmarks stay the same.

Resolution: There is native functionality in Excel (and Word for that matter) that allows a user to remove any or all of the shapes in the document at the same time. Excel considers tickmarks to be shapes so this options works well. One button will have to be added to a toolbar in Excel to get this option. The steps for adding the toolbar button and actually deleting the tickmarks are below.

Add Toolbar Button
  1. 1. In Excel, go to View Toolbars Customize or right-click on the any toolbar and select Customize at the bottom of the pop-up menu
  2. 2. Click on the Command tab
  3. 3. In the left panel, select Drawing
  4. 4. In the right panel, click and drag Select Multiple Objects to an existing toolbar
  5. 5. Click Close

Removing Tickmarks

  1. 1. Click the Select Multiple Objects button just added to the toolbar
  2. 2. Select objects to be removed (see NOTE below)
  3. 3. Click OK
  4. 4. Press the Delete key on the keyboard

NOTE: As a practicle matter, some workpapers can have a large number of tickmarks on them. In those cases, it may make more sense to press Select All in step 2. of Removing Tickmarks instead of selecting each tickmark individually. If this is done, be sure to uncheck each shape that is not a tickmark. The names of the shapes will help in differentiating between tickmarks and other shapes. Tickmarks are added as pictures and other shapes, such as textboxes and arrows, are added using different names.

Tuesday, June 17, 2008

Error: Workpapers won't open

Issue: Some users report that workpapers won't open when double clicked from within a binder or the application freezes when opening (e.g., Excel freezes).

Causes and Resolutions: This has a few possible causes:

  1. 1. A prompt window has opened behind the main window of the target application.

    For example, when opening a locked workpaper Engagement can be set to warn the user that the workpaper is read-only. The warning window may open behind the Word or Excel shell. The user will have to select another application, such as Outlook or Internet Explorer, and then move back to the workpaper application.

  2. 2. Microsoft Office applications didn't close properly.

    Sometimes when a user closes Word or Excel, the workpaper closes and the shell of the application disappears but the application is still running in the background (i.e. still shows under the Processes tab in the Windows Task Manager). Enter the Windows Task Manager (press Ctrl-Alt-Del and select Task Manager). Find the appropriate application in the Processes tab and select it then press the "End Task" button in the lower right corner of the window. A warning box will pop-up asking if this is really what the user wants to do. Click "Yes". Try to open the workpaper again from within the binder.

  3. 3. Adobe Acrobat is open as a plug-in or add-in to Internet Explorer.

    I don't know why this happens but sometimes after opening a PDF through Internet Explorer a PDF workpaper won't open properly. Engagement appears to go through the motions but nothing shows up on screen. Open Windows Task Manager and end the Acrobat.exe process (see 2. above).

  4. 4. The tab name in an Excel file is too long or formatted incorrectly.

    This happens mostly when the Excel file is created automatically by the information systems of a client or third party. Find the longest tab name in the Excel file and shorten it. Then add the adjusted file to the binder.

Monday, June 16, 2008

Error: Non-recognizable File Name in Title Bar

Issue: When opening an Acrobat document (PDF), the name of the document is not recognizable in the title bar of the window. It just displays a bunch of letters and numbers. (Engagement version 5.0 and below)

Cause: This is caused when a user has the "Open separate instances of Acrobat (Dual Screens)" checked from Tools Options General.

Resolution: Currently, there is no know fix to this problem other than unchecking the Dual Screens option mentioned above.

Friday, June 13, 2008

Error: Can't set the installed property of the add-in.

Updated: March 16, 2009

Issue: I've seen the case where a user tries to open an Excel document from within a binder and receives a message similar to this one.

"Can't set the installed property of the add-in."

Cause: This is caused when Engagement's add-in becomes disabled for one reason or another.

Resolution: This is an Excel error and can be resolved by:

  1. 1. Close all instances of Excel (This especially applies to all users with "Launch separate instances of Excel (Dual Monitors)" checked under Tools Options General)
  2. 2. Open Excel from outside Engagement
  3. 3. Go to Tools Add-Ins
  4. 4. Make sure "Epace" is checked
  5. 5. Click OK
  6. 6. Close Excel

Additionally, go to Help About Microsoft Excel Disabled Items. Make sure Epace.xla is not listed as disabled. If it is, select it and press Enable.

This should solve the problem.

Thursday, June 12, 2008

Why no troubleshooting knowledgebase?

I've spent fruitless hours scouring the internet in search of an online knowledgebase of tips for ProSystem fx Engagement. To my suprise, I haven't found one yet. How any software company can horde all the support information is beyond me. Well, I'm tired of waiting so I decided to start this little blog to get people talking and posting. So, please feel free to reply to the posts (and do so often).

UPDATE: CCH has developed a support knowledge base for all its products including ProSystem fx Engagement. It can be found here.